

How to Apply the Soft Gel System Step by Step
By Foxy Brands • 6 min read • Nails & Professional BeautyPor Foxy Brands • Lectura: 6 minutos • Uñas & Belleza Profesional
Everything you need, in one kitTodo lo que necesitas, en un solo kit
The Foxy Soft Gel Kit was designed so that any nail professional — or motivated beginner — can achieve salon-quality results from day one. No mixing, no guessing, no complicated techniques. Just a clean, simple system that works.El Kit Soft Gel de Foxy fue diseñado para que cualquier profesional de uñas — o principiante motivada — pueda lograr resultados de salón desde el primer día. Sin mezclas, sin complicaciones. Solo un sistema limpio y simple que funciona.
What's in the Foxy Soft Gel Kit¿Qué incluye el Kit Soft Gel de Foxy?
- PH Bonder — Preps and dehydrates the natural nail
- Primer — Creates the bond between gel and nail
- Extend Gel — The adhesive gel that bonds the tip to the nail
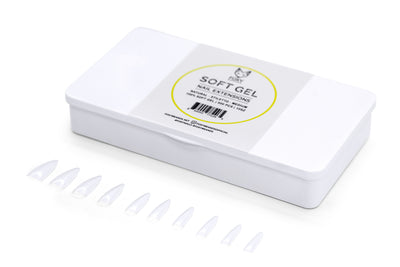
- Soft Gel Tips (Nail Box) — Pre-formed tips in multiple shapes and sizes
- Builder Gel — Adds structure, strength, and finish
- Top Coat — Seals and protects for a glossy, long-lasting result
- PH Bonder — Prepara y deshidrata la uña natural
- Primer — Crea la unión entre el gel y la uña
- Extend Gel — El gel adhesivo que une el tip a la uña
- Cajas de Uñas (Tips) — Tips preformados en múltiples formas y tamaños
- Builder Gel — Agrega estructura, fuerza y acabado
- Top Coat — Sella y protege para un resultado brillante y duradero
Step by step: How to apply Foxy Soft GelPaso a paso: Cómo aplicar el Soft Gel de Foxy
♦ Step 1 — Prep the natural nail
Push back the cuticles and lightly buff the surface of the nail. Remove any dust with a clean brush. The nail must be completely clean and oil-free before application.
♦ Step 2 — Apply PH Bonder
Apply a thin layer of PH Bonder to the entire nail surface. Do not cure. Let it air dry for 30–60 seconds. This step dehydrates the nail and removes any remaining oils.
♦ Step 3 — Apply Primer
Apply a thin layer of Primer and let it air dry until it becomes tacky. Do not cure. This creates a strong bond between the natural nail and the gel tip.
♦ Step 4 — Select and size the tip
Choose the correct tip size for each finger — it should cover the entire nail from sidewall to sidewall without touching the skin. Size all 10 nails before applying.
♦ Step 5 — Apply Extend Gel to the tip
Apply a small amount of Extend Gel to the inside of the tip. Place it at a 45-degree angle at the free edge of the natural nail, press down firmly, and hold for 5–10 seconds.
♦ Step 6 — Cure
Cure under your UV/LED lamp for the recommended time. The tip is now bonded to the natural nail.
♦ Step 7 — Apply Builder Gel
Apply Builder Gel over the entire nail to add structure and smooth out any unevenness. Shape and thin out toward the cuticle area. Cure under the lamp.
♦ Step 8 — File and shape
Use a nail file to shape the free edge to your desired length and shape — coffin, almond, square, or round. Remove dust.
♦ Step 9 — Apply Top Coat
Apply a thin, even layer of Top Coat over the entire nail. Cap the free edge. Cure under the lamp for a glossy, long-lasting finish.
♦ Step 10 — Finish
Apply cuticle oil around the nail and massage in. The set is complete — and it should last 3–4 weeks.
♦ Paso 1 — Prepara la uña natural
Empuja las cutículas hacia atrás y lija suavemente la superficie de la uña. Retira el polvo con un cepillo limpio. La uña debe estar completamente limpia y libre de aceites antes de aplicar.
♦ Paso 2 — Aplica el PH Bonder
Aplica una capa fina de PH Bonder en toda la superficie de la uña. No cures. Deja secar al aire 30–60 segundos. Este paso deshidrata la uña y elimina los aceites restantes.
♦ Paso 3 — Aplica el Primer
Aplica una capa fina de Primer y deja secar hasta que quede pegajoso. No cures. Esto crea una unión fuerte entre la uña natural y el tip de gel.
♦ Paso 4 — Selecciona y talla el tip
Elige el tamaño correcto del tip para cada dedo — debe cubrir toda la uña de lado a lado sin tocar la piel. Talla los 10 dedos antes de aplicar.
♦ Paso 5 — Aplica el Extend Gel al tip
Aplica una pequeña cantidad de Extend Gel en el interior del tip. Colócalo en ángulo de 45 grados en el borde libre de la uña natural, presiona firmemente y mantén 5–10 segundos.
♦ Paso 6 — Cura
Cura bajo tu lámpara UV/LED el tiempo recomendado. El tip ya está unido a la uña natural.
♦ Paso 7 — Aplica el Builder Gel
Aplica Builder Gel sobre toda la uña para agregar estructura y suavizar cualquier irregularidad. Afina hacia la cutícula. Cura bajo la lámpara.
♦ Paso 8 — Lima y da forma
Usa una lima para dar forma al borde libre — coffin, almendra, cuadrada o redonda. Elimina el polvo.
♦ Paso 9 — Aplica el Top Coat
Aplica una capa fina y uniforme de Top Coat sobre toda la uña. Sella el borde libre. Cura bajo la lámpara para un acabado brillante y duradero.
♦ Paso 10 — Termina
Aplica aceite de cutículas alrededor de la uña y masajea. El set está completo — y debe durar 3–4 semanas.
♦ 10 steps. 10 nails. Less than 20 minutes. That’s the Foxy system.♦ 10 pasos. 10 uñas. Menos de 20 minutos. Ese es el sistema Foxy.
“The right system doesn’t just make beautiful nails — it makes the process effortless.” “El sistema correcto no solo crea uñas hermosas — hace que el proceso sea sin esfuerzo.”
Get the complete Foxy Soft Gel KitObtén el Kit Soft Gel completo de Foxy
Everything you need in one box. Professional results from day one.Todo lo que necesitas en una sola caja. Resultados profesionales desde el primer día.
SHOP THE KIT →Coming next:Próximos artículos:
→ Gel Polish: Why It Lasts Longer Than Regular PolishEsmalte Gel: Por qué dura más que el esmalte regular
→ Perfect French Manicure with Soft GelManicure Francesa Perfecta con Soft Gel
→ How to Care for Your Cuticles and Hands Like a ProCómo cuidar tus cutículas y manos como profesional

Leave a comment